The hardening furnace TAV H6-t is compliant to Nadca 207 specification
I first encountered the Nadca 207 specification in 1999. At that time, a large die weighing 400 kg, hardened by our heat treatment plant, cracked in the die casting foundry, and the tool shop wanted to be compensated for the damage caused. We did not believe that the fault was on our side. But then we learned about the Nadca 207 specification, and because we had good contacts, we invited Mr. Corwyn Berger, one of the co-authors of the specification, to a lecture in the Czech Republic. His presentation "Extended tool life on die casting" permanently changed our views and the way we work in the heat treatment shop.
So, what does this specification cover? This is a document prepared by the Nord American Die Casting Association for its members, and its task was to specify generally valid recommendations on how to produce dies for die casting with maximum tool life in terms of thermal fatigue.
However, the content of this specification is so well processed that it is valid not only for the production of die casting dies and for thermal fatigue, but also for many other applications, and is the best information material for commercial vacuum heat treatment plants, tool shops and die casting foundries, enabling the elimination of fundamental errors in the tool making process.
In particular, it specifies what the input material should look like in order to maximize its mechanical properties, and transforms these properties into impact strength values tested in the conformity to ASTM A370, that the material must meet before it can be attached to a machine tool. However, this specification also provides guidance to steelmakers on how hot work steel must be prepared for die casting dies, what properties it should have, and how these properties are tested.
But that's not all in the specification. It is also a guide for designers on what material to use for die casting inserts, or for buyers, how to specify a purchase order so that we get a die steel that has the properties we require. At the same time, there is a detailed instruction on how to verify the input quality of the material before starting the production of the die.
However, the specification also gives a complete description of the high-speed gas quenching process, in such a form that vacuum hardening or tempering furnaces can be meaningfully programmed according to this description. Based on the load thermocouples measuring Ts (surface) and Tc (core) temperatures, both the heating and the cooling of the dies during hardening cycle can be controlled automatically, without risking large hardening cracks, and at the same time maintaining the purchased steel properties, i.e., maximum impact strength measured again by Charpy tests.
If a die casting foundry, tool shop or commercial heat treater wants to work under Nadca 207, it must be aware of a few basic rules:
- The purchased steel quality is a material property that the heat treatment plant cannot improve by any heat treatment process. Its task is therefore to maintain these properties, but not to worsen them. Tool shops must therefore know that the purchase of die steel and the control of its input properties have absolute priority.
- As the quality of the steel is determined by the method of its primary production, it is recommended to use die steels remelted by the ESR, VAR or P-ESR process
- The highest resistance to the propagation of cracks from thermal fatigue is shown by the structure of tempered martensite, without portion of bainite or perlite, provided that at the same time we quenched so fast that we exclude the area of carbide precipitation according to CCT diagram (see Fig. 3).
- The quality of the input die material and the quality of the heat treatment can be verified by measurable parameters. Based on the evaluation of impact strength, we are able to determine whether the input material has the required properties, and in the same way we are able to verify whether the hardening process was done correctly or not.
- When hardening in gas, the high cooling rate required to achieve the correct structure takes precedence over minimizing distortions. It is up to the designer and technologist to prepare the dies for hardening so that, with regard to deformations and dimensional changes, the finishing allowances are sufficient, and at the same time that the shapes are chosen so that hardening cracks can be excluded
- It is not possible, even in good faith, to require the heat treatment of die casting dies without deformations or with minimal deformations. Any reduction in the cooling rate, in order to achieve smaller distortions, will lead to the formation of structures with lower resistance to thermal fatigue and lower die life.
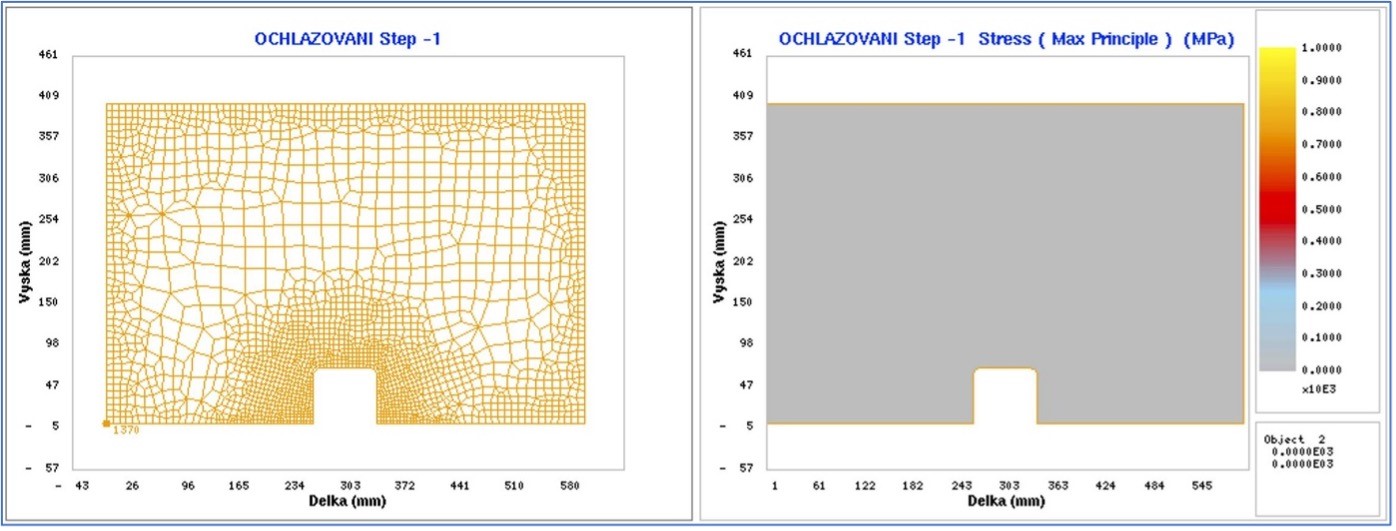
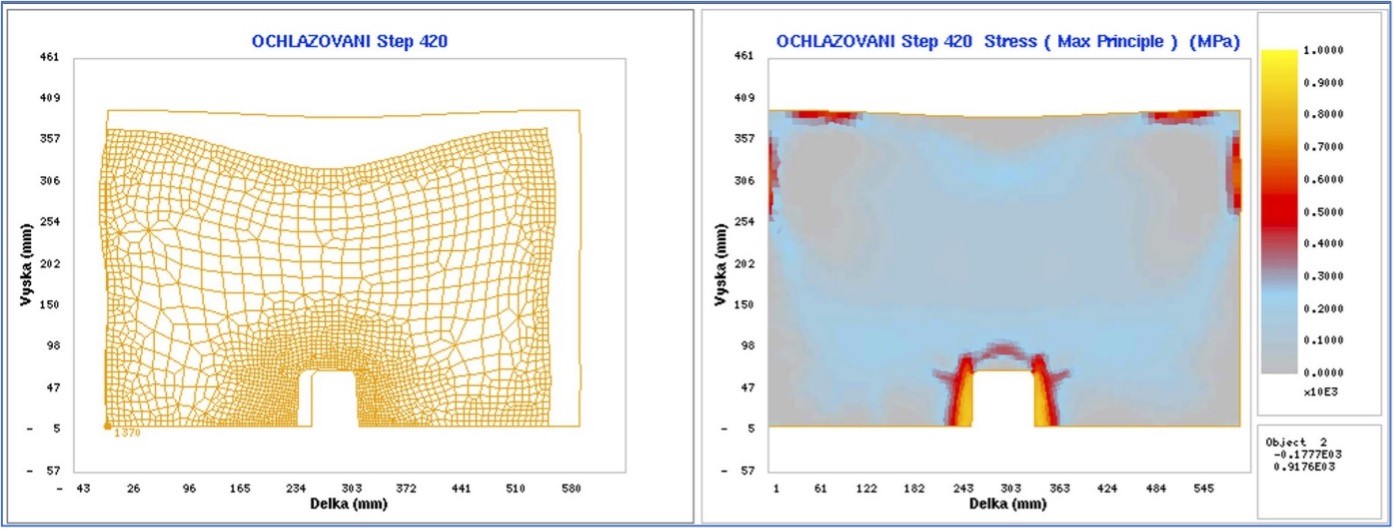
- Deformation-free hardening, even in a gas flow, does not exist. Therefore, the minimum allowances for the HPGQ process must be 0.025 to 0.050 mm per 25 mm dimension. This is therefore 0.4 to 0.8 mm for an insert with a side length of 400 mm. However, because we apply the so-called precautionary rule in the heat treatment shop, we will always prefer higher values (Fig. 1 and 2)
- Because the maximum tensile stresses during quenching are located in the notch or on the outer side of the die, in these places is necessary to work with radius of at least R3. However, it must be stated that even the radius R10 in the critical notch reduces the stress by only half the value of the stress in the notch without the radius


Fig. 1 a 2 - Simulation of crack formation in Deform around a notch with R10 milled on a piece measuring 600x400 mm during cooling from a temperature of 1050 C to 20 C, simulation time 8000 s, state before and after cooling with the indication of areas with the maximum tensile stress (red areas)
- In order to properly control and monitor the heat treatment process, we must measure temperatures at Ts and Tc. To make this feasible, it is necessary to have holes for thermocouples. This is the responsibility of the tool manufacturer; the heat treater has no means to make these holes
- Nadca 207 states only one austenitization temperature for each steel listed in its list of recommended materials, without a tolerance band. E.g., for Dievar it is 1010 °C. In order to be sure that the heat treater actually performed hardening at this temperature, the hardening furnace must be qualified. Whether we work according to AMS 2750F or according to CQI-9, it must therefore have a valid TUS (Temperature Uniformity Survey) and SAT (System Accuracy Test) in periodicity according to the furnace class, in our case usually Class 2. It must therefore be clear that when the furnace temperature programmer is set to 1010 °C, this temperature is actually in the furnace. Therefore, we can only put parts for hardening in a heat treatment plant, which has a completely clear and demonstrable system of maintenance and validation of furnaces, and where it is certain that the very specific requirements of Nadca 207 will be met.
- It is generally known that each quenching furnace with gas stream cooling has different cooling parameters depending on the gas overpressure, the gas velocity and the size of the gas/water heat exchanger. Therefore, the only common, measurable parameter is the cooling rate, measured at Ts, which is prescribed at a value of at least 28 °C/min. It does not matter if we harden with an overpressure of 2 bar or 10 bar, we must always achieve a cooling rate of at least 28 °C/min in the area between the austenitization temperature and the isothermal hold. This cooling rate is easy to read from the cycle record and is therefore easy to control
- The isothermal holding should be set at a temperature of around 425 +/-28 °C, but not at a temperature of 500 °C or 600 °C. This would mean lower deformation, but at the same time there would be inter-crystalline precipitation of carbides, and thus worsen the impact strength of the material.
- In order for the hardening furnace to handle all heating and cooling steps, its control system must be very sophisticated. It must be possible to control all process steps automatically, without operator intervention, on the basis of monitoring the furnace temperature Tp and the temperatures on the load thermocouples Ts and Tc
Fig. 3 – Example of a sophisticated control system of the hardening furnace TAV 6t, enabling fully automatic control of the hardening process according to Nadca 207
Fig. 4 – Quenching steps according to Nadca 207 entered in the CCT diagram
- We should temper the dies so that each structural part of the steel matrix is tempered twice, including martensite, which is formed by the transformation of residual austenite after the first tempering. In order to achieve optimal mechanical properties, it is therefore necessary to temper 3 times.
- Systematic tests of verification of the steel quality at the input in tool manufacturing process and after hardening by measuring the impact strength show that 15% of the supplied material for die casting dies does not meet the requirements of Nadca 207
- In all cases where the material does not meet the requirements of Nadca 207 by performing an impact test at the input in tool shop, it will not meet these requirements even after hardening with a real part. It is just proof that the purchased steel quality cannot be improved.
The above rules are only the basic ones. In practice, even more need to be applied. However, if they are understood and implemented by a tool shop and by heat treater, the result will achieve the goal of the whole process according to Nadca 207, i.e., maximizing the resistance of tools to the occurrence of cracks from thermal fatigue.

Do you like this blog?
For us your opinion matters, so we would be very pleased if you could write a review about us or our blog.