AMS 2750F has been reviewed and updated with the revision G at the end of June 2022, the document has the same length. Revision G deleted some tables, now there are only 22. Small changes have been made to better clarify the meaning. Transition requirements from Rev. E to Rev. F (allowed for 2 years) have been eliminated with only one transition exception:
Digital recording instruments that read only integers may be used for 1 year after the release of AMS 2750 Rev. G and must have a maximum calibration accuracy of ±1 °C or ±0.2% of the temperature reading rounded toward the smallest integer.
This latest transition is extended to 1 year after the release of Rev. G (see 3.2.3.2.1), so applicable from June 29, 2023 (as the last date), then all temperature recorders must be digital and read the decimal degree (°C or °F).
What has changed?
- Rev. G removed all references to analog instruments, only the digital ones are allowed!
- Sensitivity Test has been deleted and no longer required for digital instruments ....... however you should take into account your customers’ requirements.
- For load sensors, required in vacuum furnaces, records must include sensor batch number, load cycle, temperature and usage count which must include usage during SAT and TUS.
- Table 6 rewritten to remove decimals – It rearranges Celsius version of Rev. E.
| Set Temperature |
Maximum Replacement
Interval or Number of Uses |
| >2300 °F |
>1260 °C |
One use |
| >2200 to ≤2300 °F |
>1205 to ≤1260 °C |
Quarterly or 10 uses |
| >1800 to ≤2200 °F |
>980 to ≤1205 °C |
Quarterly or 90 uses |
| >1200 to ≤1800 °F |
>650 to ≤980 °C |
Quarterly or 180 uses |
| >500 to ≤1200 °F |
>260 to ≤650 °C |
Quarterly or 270 uses |
| ≤500 °F |
≤260 °C |
Quarterly unlimited uses |
AMS 2750 Rev. G defines in detail when to repeat the SAT test:
- 3.4.2.3 SAT (comparative, alternative, or ratio restoration for the SAT "waiver"), shall be made after any maintenance work that could impact the SAT difference requirement.
Examples include, but are not limited to:
- Sensor replacement for the system under test, (example: systems using individually calibrated sensors require a SAT at replacement time of each sensor, but systems using sensors calibrated by the same roller/reel/bundle require a SAT when roller/reel/bundle has to be replaced
- Replacement of the control or recording instrument.
- Calibration of the control or recording instrument once any adjustment has been made.
- If a correction offset is introduced, an existing correction offset is removed or modified.
- After the implementation of corrective action due to a failed SAT.
The standard makes it clear that following an SAT failure, the effect of the adjustment (correction offset) must be evaluated over the entire range in qualified use, in addition there must be an objective (documented) evidence that the adjustment (correction offset) is not a cause of other failures such as TUS, etc.
Regarding the TUS test, Section 3.5.1.4 adds an important clarification: the hot junction of the TUS sensor defines the volume of the plant work zone, so no tolerance is allowed. Before performing each TUS, the pyrometry technician MUST measure whether the dimensions between the hot joints of the TUS sensors match the dimensions of the qualified operational working volume as reported on the plant data sheet.
In Section 3.5.14.1.9 is restored an old requirement regarding the failure of a TUS tests. A new detection is required when the corrective action for a failed TUS results in the implementation of a modification offset or if the qualified operating temperature range exceeds 165 °C. The uniformity has to be verified at the extreme temperatures of the TUS range in which the offset is applied. The TUS temperatures for each offsets range must not be more than 335 °C apart.
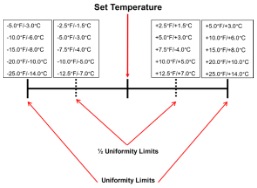
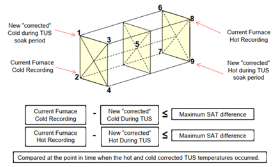
Section 3.5.15.2.2 – with reference to the hottest/coldest sensors re-location for type A and C instrumentation, two figures have been added for clearer the application of the two options allowed for not relocating.

1st option: The relocation of sensors is not necessary if the temperature uniformity of the latest TUS test is included within the half tolerance required.

2nd option : The relocation of sensors is not necessary, if the difference, of the current registration (Hottest/Coldest) to the position (Hottest/Coldest) of the latest TUS test, falls within the SAT difference requirement.
AMS2750G is official from June 29, 2022, typically application is required within 90 days, but each customer has its own rules on implementation. Although most Nadcap "Primes" will follow the decisions of the HTTG heat treatment activity group. Nadcap will apply the new specification during audits only after 90 days after check list AC7102/8 is revised to Index B. All companies must be fully compliant by that date. Mixed systems are not allowed in the transition.
Write us if you need more information